
In heavy machinery and off-road equipment, each part is vital for performance and avoiding costly downtime. The oil cooler, often overlooked, is crucial for maintaining engine oil temperature, ensuring proper lubrication during demanding conditions. However, when it fails, a leak can quickly change from a minor problem to major engine damage.
This guide helps machinery owners and operators identify, understand, and fix oil cooler leaks. It covers everything from early signs of trouble to a detailed step-by-step replacement process, ensuring your equipment runs smoothly and safely.
What Is an Oil Cooler Leak?
An oil cooler leak is any escape of fluid from the oil cooler assembly or its connections. These leaks can be external, where fluid drips onto the ground, or internal, where oil and coolant mix within the system. And both types of leaks compromise the engine’s health and require immediate attention.
What Causes an Oil Cooler Leak?
Heavy equipment operates in tough environments, so the oil coolers are vulnerable to failure. Recognizing the causes helps you diagnose and prevent the oil cooler leak.
- Aging and Wear: Like all parts, oil coolers and seals weaken over time from exposure to heat and pressure. Gaskets and O-rings become brittle and crack, causing leaks.
- Corrosion: Moisture and chemicals can corrode metal parts from the inside, and create weak spots that may rupture.
- Vibrations and Damage: Heavy machinery’s vibrations can loosen fittings or crack the cooler, and off-road impacts from rocks and debris also pose risks.
- Incorrect Installation: Poor gasket placement or overtightening can stress parts, leading to early failure.
- Clogged Passages: Debris in oil or coolant may block passages, increasing pressure and causing leaks.
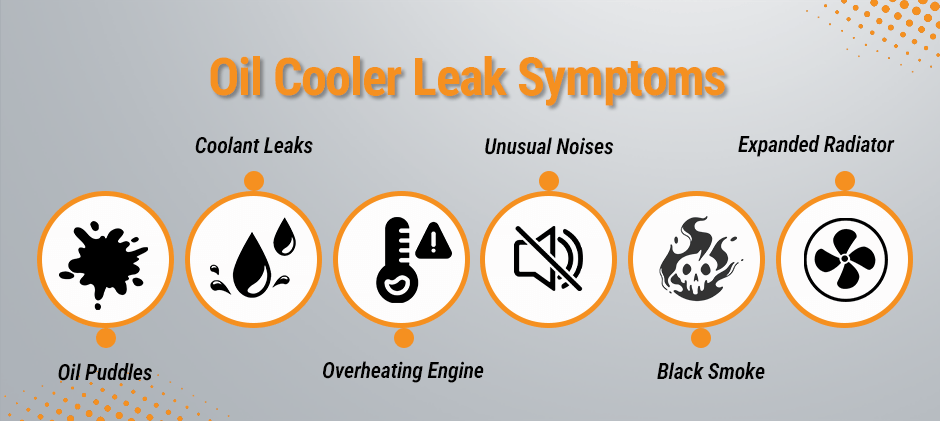
4 Symptoms Tell You an Oil Cooler Leak
Detecting an oil cooler failure early is crucial to avoid serious engine damage. So, look out for these warning signs.
1. External Fluid Leaks
- Oil Puddles: The clearest sign is a pool of engine oil beneath your machine. This can vary from a small drip to a steady flow, indicating a leak from the cooler, its lines, or the adapter gaskets.
- Coolant Leaks: For oil-to-water coolers, you might notice coolant puddles. A coolant leak is equally serious, as it can cause the engine to overheat.
2. Internal Fluid Contamination
- Oil in the Coolant: A common indicator of internal cooler failure is oil in the coolant. The higher pressure of the oil system pushes oil into the cooling system, resulting in a thick, milky, or “gravy-like” substance in the coolant reservoir.
- Coolant in the Oil: Although less frequent, a significant leak allows coolant into the oil, making it look milky or frothy on the dipstick and severely impairing lubrication.
Pro Tip: If you see oil in the coolant, the oil cooler is likely the cause. Since oil pressure exceeds coolant pressure, oil almost always leaks into the coolant during an internal failure.
3. Engine Performance Issues
- Overheating Engine: A failing oil cooler cannot properly regulate oil temperature. Hot oil becomes less effective at cooling and lubricating, causing the engine temperature to rise and risking overheating.
- Reduced Performance: The machine may feel sluggish or less powerful. When the engine overheats, its management system may reduce performance to protect itself.
- Warning Lights: Failure of the cooler can trigger dashboard lights such as check engine, low oil pressure, or high temperature alerts.
- Unusual Noises: Knocking, ticking, or grinding sounds may indicate poor lubrication from low oil levels or contaminated oil.
4. Other Physical Signs
- Black Smoke: Oil leaking into combustion chambers burns and emits thick black exhaust smoke.
- Expanded Radiator: Severe internal leaks can increase pressure, causing the radiator or hoses to swell and possibly rupture.
Can I Operate With a Bad Oil Cooler?
No. Continuing to operate machinery with a suspected bad oil cooler is extremely risky. A small leak can quickly become a major failure, leading to a loss of all engine oil or coolant. This can cause the engine to overheat and seize in a matter of minutes, resulting in catastrophic damage that is far more expensive to repair than the oil cooler itself.
Oil Cooler Leak Consequences
Ignoring the symptoms of a leaking oil cooler can lead to many problems:
- Accelerated Engine Wear: Poor lubrication from contaminated or overheated oil causes rapid wear on critical components like bearings, pistons, and the crankshaft.
- Cooling System Blockage: The sludgy mixture of oil and coolant can clog the radiator, heater core, and coolant passages in the engine, requiring an intensive and costly flush.
- Complete Engine Failure: The ultimate consequence is a seized engine, which often requires a complete rebuild or replacement.
- Safety Risks: An engine that fails unexpectedly during operation poses a significant safety hazard to the operator and anyone nearby.
What to Do When You Suspect an Oil Cooler Leak?
Once you suspect a leak, the first step is to confirm its source. While an external leak might be easy to spot, an internal one requires a definitive test.
A pressure test is the most reliable method to confirm an oil cooler leak.
- Carefully disconnect the oil cooler from the engine.
- Securely plug one of the oil ports on the cooler.
- Attach an air hose with a regulator to the other oil port.
- Submerge the entire oil cooler in a tank of water.
- Apply a low amount of air pressure (around 0.8 bar or 12-15 PSI) to the cooler.
- Watch for air bubbles emerging from the cooler’s core or seams. If any bubbles confirm a leak, the cooler must be replaced.
Leaking Oil Cooler Step-by-Step Replacement Guide
Replacing an oil cooler is a manageable task for someone with mechanical experience. Here is a general guide:
- Ensure Your Safety: Ensure the engine is completely cool. Disconnect the battery to prevent any accidental starts.
- Drain Fluids: Place drain pans under the oil pan and radiator, and then drain the engine oil and the engine coolant.
- Gain Access: Locate the oil cooler. On many machines, it is mounted to the side of the engine block or near the oil filter. You may need to remove other components to access it.
- Disconnect Lines: Carefully disconnect the oil lines and coolant lines from the cooler. Be prepared for some residual fluid to spill.
- Remove the Old Cooler: Unbolt the oil cooler from its mounting bracket or the engine block. Note the orientation of any gaskets or seals.
- Clean Surfaces: Thoroughly clean the mounting surfaces on the engine block and any connecting parts. Remove all traces of the old gasket material to ensure a perfect seal for the new parts.
- Install the New Cooler: Position the new oil cooler with its new gaskets and seals. It is critical to use new seals to prevent immediate leaks.
- Tighten Fasteners: Tighten the mounting bolts to the manufacturer’s specified torque settings. Do not overtighten, because this can damage the new gaskets.
- Reconnect Lines: Reconnect the oil and coolant lines to the new cooler, ensuring all fittings are secure.
- Refill and Flush: Refill the engine with the correct type and amount of new oil and coolant. If there was cross-contamination, you must perform a complete cooling system flush to remove all traces of oil before adding new coolant.
- Check for Leaks: Reconnect the battery, start the engine, and let it run for several minutes while closely inspecting the new cooler and all connections for any signs of leaks. Check fluid levels again after the engine has warmed up.
How to Prevent the Oil Cooler Leak?
Preventive maintenance is the best strategy to avoid unexpected failures.
- Regular Inspections: During routine service, visually inspect the oil cooler and its hoses for signs of corrosion, damage, or weeping leaks.
- Keep it Clean: On off-road machinery, dirt and debris can build up on the cooler’s fins, trapping heat and moisture, which accelerates corrosion. Keep the cooler clean with low-pressure compressed air or a soft brush.
- Use Quality Fluids: Always use the high-quality engine oil and coolant recommended by your machine’s manufacturer because it helps prevent internal corrosion and sludge buildup.
- Adhere to Service Intervals: Regular fluid and filter changes are crucial for the health of the entire engine, including the oil cooler.
- Protect from Damage: If your equipment operates in rocky terrain, consider fabricating or installing a guard to protect the oil cooler from physical impacts.
How Long Does an Oil Cooler Last?
The lifespan of an oil cooler varies greatly depending on the operating environment and maintenance practices. In heavy equipment, a well-maintained cooler can last for many years and thousands of hours. However, in harsh conditions with high vibration and risk of debris, its life may be shorter.
Oil Cooler Leak Replacement Cost
The cost to repair an oil cooler leak typically involves replacing the entire unit. The total cost can vary widely based on the machine and, most importantly, where you source your parts.
Parts: The price of the replacement part itself is the biggest variable. There is a significant difference between Original Equipment Manufacturer and high-quality aftermarket options:
- OEM Parts: Sourced directly from the machine’s manufacturer, these are the most expensive choice. Prices for an OEM oil cooler can easily range from $400 to over $5,000, depending on the brand and complexity of the equipment.
- FridayParts: High-quality aftermarket parts provide a reliable and cost-effective alternative. At FridayParts, our replacement oil coolers for a wide range of heavy equipment typically range from $100 to $2,000+.
Labor: Labor can take several hours, depending on the cooler’s accessibility. Expect labor costs to be a significant portion of the total bill if hiring a professional mechanic.
By sourcing high-quality aftermarket parts from a supplier like FridayParts and performing the labor yourself, you can save a lot of money on the total repair cost.
Conclusion
An oil cooler leak is a serious issue that requires prompt action from any heavy equipment owner. Identifying the symptoms—such as visible drips, contaminated fluids, and poor engine performance—is the first step in preventing catastrophic failure. By adopting a thorough approach to diagnosis, repair, and preventive maintenance, you can protect your engine, reduce downtime, and keep your machinery dependable for years. Therefore, when it’s time for a replacement, you need a trusted partner for parts. At FridayParts, we offer a wide selection of high-quality, affordable aftermarket oil coolers compatible with many heavy equipment brands. Don’t let a faulty cooler halt your operations. Visit FridayParts.com to find the durable components you need to get the job done right.