

A lot of John Deere mower decks end up cutting unevenly, shaking too much, or even breaking around the spindle mounts. These problems usually happen because of skipped maintenance, built-up dirt and debris, or worn-out metal from years of use. This guide will show you John Deere mower deck repair guide. We’ll use simple, professional repair and maintenance tips to help your equipment last longer, cut grass cleanly, and avoid early mechanical damage.
Removing the Deck for Service
- Safely take the mower deck off the main machine. You’ll just need to remove 4 to 5 bolts and nuts total, though the exact number varies a little by model. After you take off the outer covers, you can start working on the mechanical linkages.
- Pull out the cotter pins on the deck support arms that connect to the mower frame. There are four main connection points: one top and one bottom on both the left and right sides. Then, disconnect the front support rod to free up the front of the deck.
- You’ll also need to take off the drive belt before sliding the deck out. This belt connects the mower’s drive shaft to the pulley on the deck. Once the belt is removed, jack up the mower a bit to create more space. This lets you slide the deck out from under the machine easily.
Pro tip: Put all cotter pins, nuts and small parts in a magnetic tray or labeled container while you work. Losing any specialty hardware will slow you down a lot when you put the deck back together.
Common John Deere Mower Deck Problems
Once the mower deck is off, take it apart so you can check each part closely. Remove the blades, spindles, pulleys, and tensioner. This makes it easier to find worn or damaged parts before you start repairs. Use the checklist below to inspect each part and see what needs to be repaired or replaced.
| Component | Signs of Wear/Failure |
|---|---|
| Idler Pulley | Bearing play, grinding noise, or rust on the V-groove. |
| Spindle Pulley | Damage to the center mounting splines or corrosion. |
| Drive Belt | Cracking on the underside, frayed edges, or glazing. |
| Tensioner Arm | Seized pivot point or weakened tension spring. |
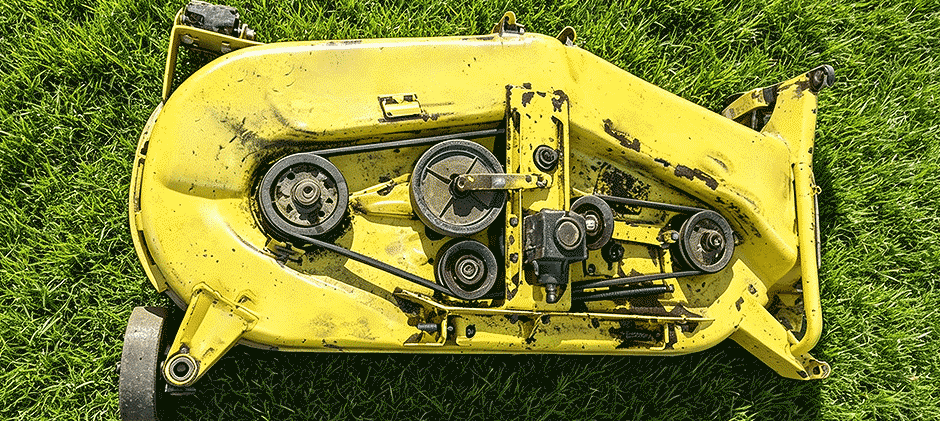
How to Repair a John Deere Mower Deck?
Repair Cracked Spindle Mounts
Spindle mount damage is extremely common on heavily used mower decks. The spindle breaks loose from the deck shell when the 5/16-inch mounting holes get stretched out, or the surrounding metal tears off completely. You don’t have to throw the deck away if this happens — you can fix it perfectly with a spindle reinforcement ring.
- Start by prepping and cleaning the damaged area really well. Fit a wire wheel to your angle grinder to clear off all rust and built-up grass gunk. Then switch to a flat grinding disc to smooth out burrs and level the metal surface. You need a totally clean, flat surface to get a solid, strong weld.
- Set the metal reinforcement ring over the damaged hole. A MIG welder with an Argon/CO2 gas mix works best for this job. It keeps the welding arc steady and cuts down on splatter, which is super important for the thin steel on mower decks. Do two tack welds on opposite sides to hold the ring firmly in place.
- Always check blade clearance before you finish welding. Install the spindle and a new blade temporarily to make sure it spins freely, without hitting the deck or other blades. Be sure to use new blades for this check — worn blades are shorter, so they’ll make you think you have enough clearance when you might not.
- The reinforcement ring adds extra thickness to the mounting spot, so your original bolts will be too short to tighten properly. Swap them for part 285039 — these bolts are the right length to mount the spindle securely.
- Once you’ve confirmed the clearance is good, take the spindle back out. Lay a continuous weld bead all the way around the ring’s edge. Weld small sections at a time, and let the metal cool between each pass. This stops the thin deck metal from warping from excess heat. After the weld fully cools down, apply a few coats of John Deere yellow paint to protect the metal from rust.
Replace Pulleys
Inspect the entire drive system for wear. Spin each pulley by hand and listen for grinding noises, and feel for any looseness or “play” in the bearing. If a pulley is noisy, feels loose, or shows signs of rust and corrosion in its V-groove, it should be replaced.
- When trying to remove old pulleys, you may find that the mounting bolts spin freely without loosening. To solve this, use an open-end wrench to hold the nut on the bottom steady while you turn the top bolt with a socket wrench.
- If you are replacing idler pulleys or the spindle pulley be careful to save the small plastic sleeves from the old parts. These sleeves fit inside the bearing and are essential for keeping the pulley correctly aligned on its mounting post.
- It is also a good practice to apply grease to the mounting posts before installing the new pulleys to prevent them from seizing in the future.
Replace the Drive Belt
While you’re checking the pulleys, take a good look at the drive belt too. Inspect it for common wear issues: cracks on the bottom side, frayed edges, or shiny glazed spots on the surfaces that touch the pulleys. A worn belt will slip when the mower is working hard. This ruins your cutting quality and can even damage other parts of the deck. If you see any wear, replace the belt.
To install a new belt, release the tension on the idler arm first, then take off the old belt. Route the new belt around the main drive pulley, spindle pulleys and idler pulleys, following the belt diagram for your specific mower model.
Sharpen or Replace Blades
Sharp blades are super important for clean grass cuts and take extra stress off your mower’s engine. Use a bench grinder or hand grinder to sharpen the blade edges, and always keep the original factory blade angle.
When taking blades off or putting them on, slide a block of wood between the blade and the deck. This locks the blade and spindle in place, so they won’t spin while you tighten or loosen the center bolt.
If your blades are bent, badly chipped, or overly worn, don’t just sharpen them — replace them completely.
Reinstall and Test the Deck
- When taking blades on and off, stick a block of wood between the blade and deck. This stops the spindle from spinning while you tighten or loosen the center bolt.
- When reinstalling a spindle, use self-tapping bolts. Keep in mind most new spindle housings have smooth, unthreaded mounting holes. These special bolts cut their own threads into the aluminum housing the first time you install them. Start every bolt by hand to avoid stripping the threads, then finish tightening them with a ratchet.
- Always tighten the bolts in a diagonal pattern, corner to corner. This makes sure the spindle sits perfectly flat against the deck. Also, add anti-seize to the self-tapping bolts. This keeps steel bolts from seizing inside the aluminum housing and makes future repairs way easier.
- Once all parts are fixed and ready, slide the deck back under the mower. Reconnect the support arms and reinstall the cotter pins you took out earlier. Put the drive belt back on the main pulley, then reattach the tensioner spring to get the right belt tension.
- Before putting the top covers back on, do a quick dry test. Turn the deck on at low RPM and check that the blades spin smoothly. Make sure the belt doesn’t jump or shake, and listen for any metal rubbing, especially around the welded areas. Once everything runs quiet and steady, reinstall the top covers and tighten all hardware.
Summary
Fix your John Deere mower deck as soon as issues pop up, and you’ll steer clear of costly major breakdowns down the line. Repair cracked spindle mounts, swap out worn pulleys before they break, and maintain your deck properly. This delivers better cutting results and helps your mower last much longer. If your inspection turns up parts that need replacing, FridayParts stocks plenty of durable aftermarket deck parts that fit most John Deere mower models.
