

A bad PCV valve usually starts small — a rough idle, a bit of extra oil use, maybe a faint hiss around the valve cover. Ignore it long enough, and it turns into gasket leaks, drivability problems, and fault codes that keep coming back. On work trucks and equipment, that kind of trouble means real downtime, which is why timely PCV valve replacement matters. Engine layouts vary, but this guide is written mainly for tractors, diesel equipment, work trucks, and other utility machines with serviceable crankcase ventilation components.
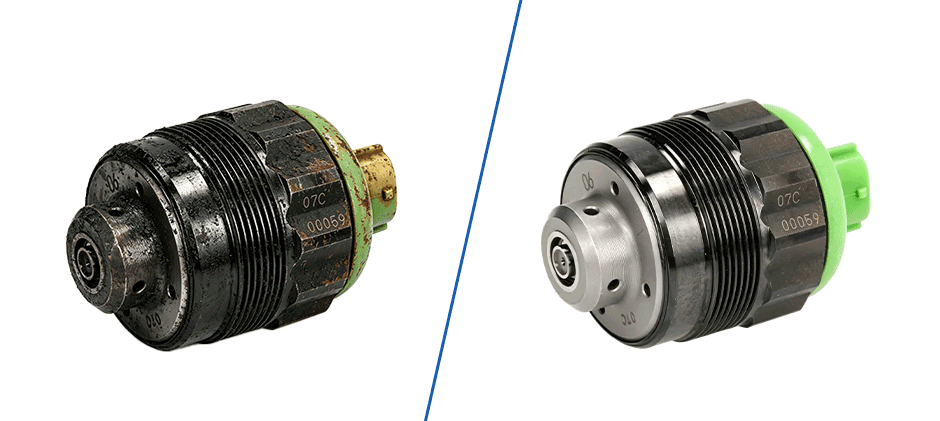
What Is a PCV Valve and When to Replace It?
The positive crankcase ventilation (PCV) valve routes blow-by gases from inside the engine back to the intake, where they burn off instead of venting out. It also keeps crankcase pressure in check, protecting seals and gaskets from being pushed loose.
Over time, oil vapor, fuel dilution, and heat cycles clog the valve or weaken its spring. Once it sticks ope/filtersn or closed, the entire ventilation loop stops working the way it should — and that is when PCV valve replacement moves from optional to necessary.
PCV valve vs. CCV filter — which one do you have?
Not every engine uses a PCV valve. Here is the quick split:
| Engine type | Ventilation part |
|---|---|
| Gas engines and older small diesels | PCV valve |
| Modern Tier 4 diesels (excavators, loaders, big trucks) | Closed crankcase ventilation (CCV) filter |
| Some newer utility engines | Combined breather cartridge |
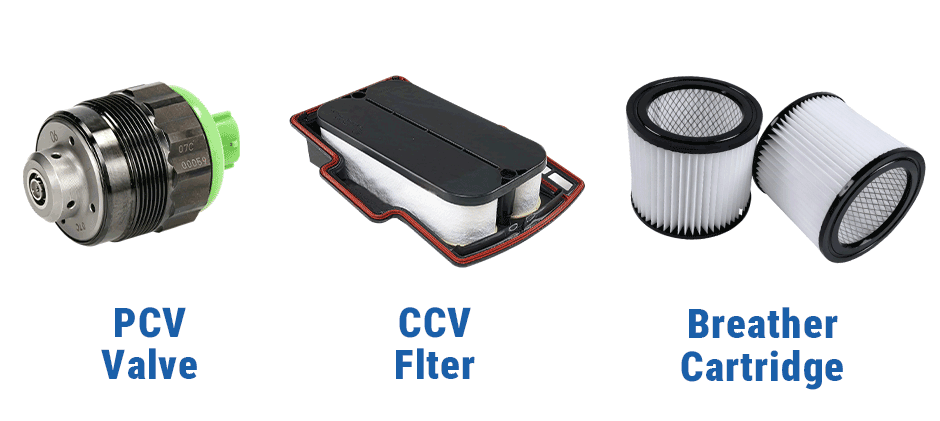
If your machine uses a CCV setup, you will swap a filter cartridge instead of a valve. Confirm the layout in the service manual before ordering parts.
Typical service life
Many PCV valves are inspected or replaced at 40,000–60,000 miles on light vehicles, while off-road equipment may need service at roughly 1,000- 3,000 hours, depending on duty cycle, oil condition, and ventilation design. Dusty jobsites, long idling, and short-run cycles all shorten that window.
Symptoms That Signal a Replacement
A bad PCV valve usually shows up as a pressure-control problem, an air-metering problem, or both. That is why the symptoms can show up as either oil-control issues, drivability issues, or both.
Watch for:
- Rising oil use between service intervals
- Rough idle, unstable RPM, or occasional stalling
- Oil seepage at the valve cover or other weak gasket points
- Oil inside the intake tube or throttle body
- A hissing or whistling sound near the valve cover
- Excess crankcase pressure at the oil filler cap
- In some applications, a check engine light with mixture or crankcase ventilation-related faults
If two or more show up together, the PCV valve and its hose connections are a smart place to start inspection, and PCV valve replacement is often justified once wear or blockage is confirmed.
How to Test a PCV Valve?
A few quick checks can usually tell you whether the valve is stuck, restricted, or no longer controlling flow correctly. Before pulling parts, run one of these quick checks:
- Shake test. On many older spring-loaded metal valves, a healthy valve rattles when shaken. If it is silent or sticky, a replacement is likely due. This quick check does not apply to every sealed or integrated design.
- Finger vacuum test. At idle, pull the valve and cover the inlet with a finger. You should feel firm suction and hear the idle drop.
- Oil cap test. With the engine running, lift the filler cap. Heavy pressure pushing it up points to a plugged valve or hose.
- Crankcase pressure gauge. For diagnostics on larger diesels, a manometer reading above spec confirms a ventilation issue.
When pressure symptoms are already showing up, it is worth checking the ventilation parts before chasing larger leaks.
Step-by-Step PCV Valve Replacement Procedure
Tools and parts checklist
Before starting, gather:
- Socket set and small flat-blade screwdriver
- Needle-nose pliers
- New PCV valve matched to your engine
- Fresh grommet or O-ring (never reuse a hardened one)
- Replace the PCV hose if the old one is cracked, oily, or collapsed
- Spring-type or worm-gear hose clamps
- Carb cleaner and clean shop rags
If the hose or grommet already shows age, it makes sense to replace them at the same time.
Step 1 — Locate the valve
On most engines, the PCV valve threads or press-fits into the valve cover, intake manifold, or a fitting on top of the crankcase breather. Trace the hose back from the intake — that is the target.
Step 2 — Inspect the hose and grommet
Squeeze the hose. If it feels stiff, sticky, or shows cracks, plan to replace it. Check the rubber grommet the same way. On older engines, the hose and grommet are often in worse shape than the valve itself.
Step 3 — Remove the old valve
- Push-in type: twist gently and pull straight up.
- Threaded type: use a deep socket or open-end wrench.
Disconnect the hose from the valve end, not from the intake side, to avoid stressing the plastic nipple.
Step 4 — Compare old and new before installing
Before installation, compare the old and new valve for hose angle, thread style, overall length, and flow direction. Take a moment to compare the old and new parts before installing. It is an easy way to catch a wrong replacement early.
Step 5 — Clean the mounting area
Wipe the seat and hose end with carb cleaner. Old sludge left behind will fight the new seal. If the area is heavily sludged, check the connected passage as well instead of assuming the valve alone was the problem.
Step 6 — Install the new valve
Check the flow arrow — it must point toward the intake. Press or thread the valve until it seats fully. Hand-tight is enough for press-fit; use spec torque for threaded units.
Step 7 — Reconnect the hose
Push the hose all the way onto the nipple, then secure it with a fresh clamp. Give a light tug to confirm the seal.
Step 8 — Start and confirm
Start the engine and let it idle. Listen for hissing, watch for leaks, and re-check the oil filler cap for normal light suction. That is how you know the PCV valve replacement is done right.
Access and Layout Differences by Equipment Type
Layout varies by machine, but a few patterns are common:
- Tractors: Usually on the valve cover; simple after lifting the hood.
- Excavators and loaders: Often behind the cab bulkhead. Many Tier 4 units use a CCV filter instead of a valve.
- Off-road diesel trucks: Look on the driver-side valve cover or on top of the oil separator.
- Forklifts and telehandlers: Small propane and gas engines keep the valve near the carburetor — a very fast change.
- Generators and industrial engines: Mounted on the breather box, a new breather element often gets swapped at the same time.
Because access and ventilation layouts vary this much between machines, confirming the engine make, model, year, and ventilation type (PCV valve vs. CCV filter) before ordering is what keeps the right part landing on the bench the first time. Cross-check the flow-arrow direction and hose-outlet angle on any product listing before adding to cart — those two details cause more wrong-part returns than any other.
Intervals and Mistakes to Avoid
Standard service intervals
Use the service manual first. The ranges below are only general maintenance guidance for PCV valve replacement intervals.
| Duty cycle | Interval |
|---|---|
| Light use, clean environment | Every 1,500–2,000 hours or 60,000 miles |
| Standard field or road duty | Every 1,000–1,500 hours or 40,000 miles |
| Severe duty (dust, heavy load, long idle) | Every 500–800 hours or at each oil-analysis flag |
When Earlier Replacement Makes Sense
- Oil analysis reporting high fuel dilution
- Repeat gasket leaks after a rebuild
- Lean-code faults that return after other fixes
Common mistakes
- Cleaning a plastic valve instead of replacing it — surface deposits may come off, but internal spring tension does not come back.
- Installing the valve backward blocks the flow.
- Reusing an old grommet that no longer seals.
- Ignoring a soft or oily PCV hose.
- Confusing a CCV filter housing for a PCV valve and forcing the wrong part in place.
- Replacing the valve without checking the intake side for sludge buildup or a restricted passage — a clogged intake port will foul the new valve fast.
- Ordering the valve alone when the hose, grommet, and clamp are equally worn — a fresh valve on aged rubber will leak within days.
- Skipping the flow-arrow check on the product listing, which leads to installing the valve in the wrong direction.
FAQ
Can I keep running the machine if the PCV valve is bad?
Short-term, yes — but expect rising oil use, gasket stress, and eventual fault codes. Fix it before the leaks cost more than the valve.
Can a plugged PCV valve really cause oil leaks?
Yes. A stuck-closed valve raises crankcase pressure, which pushes oil past the weakest seal — usually the rear main, valve cover, or oil pan gasket.
Do all diesel engines use a PCV valve?
No. Many modern Tier 4 diesels use a closed crankcase ventilation (CCV) filter instead. Older and smaller diesels often keep a traditional PCV valve.
Should the hose and grommet be replaced too?
If either shows hardening, cracking, or oil soaking, replace it with the valve. A worn hose or grommet undoes the benefit of a new valve within days.
Is cleaning a PCV valve enough, or should it be replaced?
Cleaning may remove surface deposits, but it does not restore spring tension or internal wear, so replacement is usually the better fix. Metal valves can occasionally be cleaned as a temporary measure, but plan to swap them soon after.
Bottom Line
A working PCV valve keeps gaskets sealed, oil where it belongs, and fault codes off the dash. Watch for the symptoms, replace the valve along with fresh rubber, and log the hours so the next round does not slip by. For aftermarket PCV valves and ventilation parts, FridayParts covers common tractor, excavator, and diesel truck fitments, with broad model coverage and fast shipping to minimize downtime.
