

A drive belt swap does not require advanced mechanical skills. The key is confirming the routing and setting the right tension. This guide covers how to replace a drive belt and what else to look at while the system is apart.
What Does a Drive Belt Do?
A drive belt transfers engine power to key components. Depending on the setup, the belt drives the alternator, water pump, power steering pump, AC compressor, or other components. If it slips or fails, those systems lose function. A worn or loose belt can affect charging, cooling, steering assist, and overall machine operation. Older machines often use V-belts—sometimes more than one—and routing can change depending on the model. Check the manual or belt routing guide before removal.
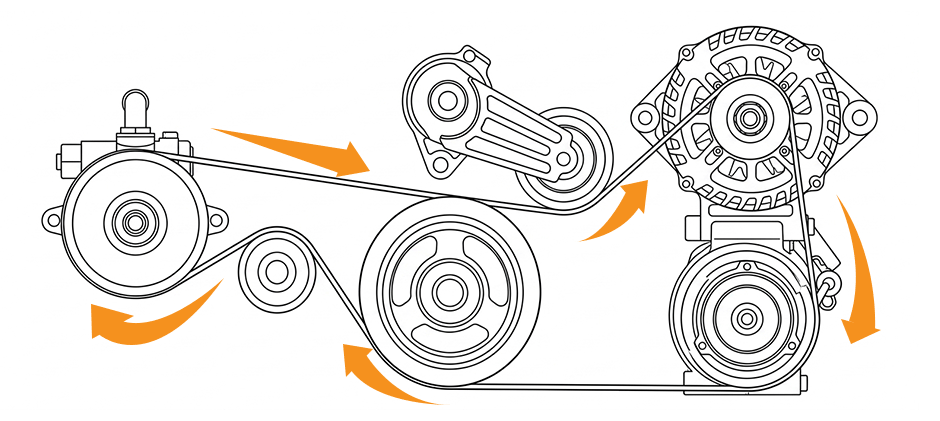
Pulley condition, idler function, and tensioner health all affect how long a belt lasts. Replace a belt without checking those, and you may be doing the job again much sooner than expected. A new belt is only as good as the components it runs on. Worn pulleys, seized idlers, or a weak tensioner will cause premature failure. Inspect the whole system before replacing the belt.
| Belt Type | Common Shape | Typical Use | Main Check |
|---|---|---|---|
| Serpentine Belt | Flat with ribs | Modern accessory drives | Rib alignment |
| V-Belt | Wedge-shaped | Older engines and some equipment | Groove fit |
| Equipment-Specific Belt | Varies by machine | Mowers, compact equipment, work machines | Routing and tension method |
Signs a Drive Belt Needs Replacement
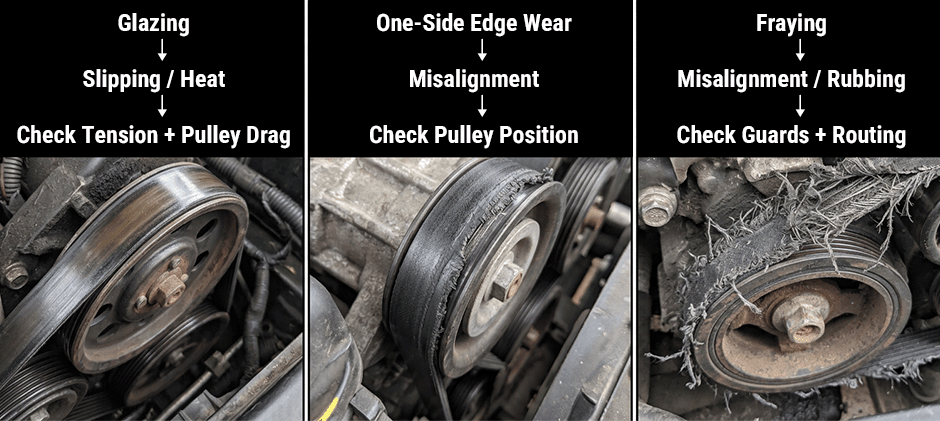
Before you learn how to replace a drive belt, you need to know when it is time. Belts usually give warning before they break. You might see wear, hear noise, or feel a change in how the machine runs. Check for cracked ribs, frayed edges, missing chunks, exposed cord, or a shiny glazed surface. Wear on one side points to pulley misalignment. Polishing means slipping or overheating.
Noise and performance signs are just as important. Squealing, chirping, a battery light, high temperature, weak steering, or a burning rubber smell can all indicate belt trouble. In some cases, the belt is simply worn. In others, the real cause is incorrect tension, pulley drag, contamination, or a weak tensioner.
The wear pattern can point you to the root cause before you put a new belt on.
| Belt Symptom | Likely Cause | What To Check Next |
|---|---|---|
| Glazing | Slipping or excess heat | Tension and pulley drag |
| Edge wear on one side | Misalignment | Pulley position and bracket straightness |
| Cracks across ribs | Age and hardening | Belt age and service history |
| Fraying | Misalignment or rubbing | Guards, guides, and routing |
| Missing chunks | Debris or pulley damage | Groove condition and contamination |
| Repeated squeal after installation | Wrong tension or a seized part | Belt tensioner, idler, or accessory bearing |
Fluid contamination also matters. Oil, grease, and coolant can shorten the life of even good replacement drive belts. If the belt area is dirty or wet, fix the leak before fitting the new belt.
How to Replace a Drive Belt: Step-by-Step
Belt replacement starts before the old belt comes off. If the routing is clear, the correct part is ready, and the supporting parts are checked properly, replacing a drive belt becomes a much more manageable job.
Before You Start
Start by gathering the correct belt, the right tools, and the routing reference for the machine.
A basic belt replacement job usually calls for:
- The correct replacement belt
- A service manual or routing diagram
- A socket and spanner set
- A breaker bar or tensioner tool
- A pry bar if the system uses manual adjustment
- A torch or work light
- Gloves and eye protection
- A phone for taking a clear routing photo
Park on level ground, shut the engine off, remove the key, and let hot parts cool before working near the belt path. If working on equipment, secure any raised attachment before putting your hands near the drive area. Taking these precautions makes the process of learning how to replace a drive belt much safer and more straightforward.
Step 1: Confirm The Belt Routing
Check the belt path before removal. This avoids one of the most common belt installation mistakes.
Look for a factory routing sticker first. If there is no sticker, use the service manual. A photo from more than one angle can save time later, especially on crowded systems. A quick sketch also helps if access is tight.
This step matters even more during serpentine belt replacement, since one wrong turn can affect belt tension or leave an accessory turning the wrong way.
Step 2: Release The Belt Tension
Release tension using the correct method for the system on the machine. Some systems use an automatic tensioner, while others use a manual adjustment point.
For an automatic tensioner:
- Fit the correct tool or breaker bar into the tensioner arm.
- Rotate the tensioner slowly in the proper direction.
- Hold the tension off the belt.
- Slip the belt off the easiest accessible pulley.
For a manual adjustment system:
- Loosen the mounting bolts on the accessory or idler.
- Back off the adjuster bolt slowly.
- Move the unit enough to free the belt.
- Remove the belt without forcing it.
Avoid prying the belt off with a screwdriver unless the service manual clearly allows it. That can damage pulley edges, belt cords, or nearby components.
Step 3: Remove The Old Belt And Inspect It
Once the belt is off, inspect it before setting it aside. The wear pattern can help explain why the system failed.
Check the ribs and sidewalls for cracking, glazing, frayed edges, missing pieces, or exposed cord. Look for dust buildup, oil staining, or coolant marks. Uneven edge wear usually points to a pulley sitting out of line.
This is also the point where many repeat failures begin. Replacing the belt without checking the rest of the system often leads to the same problem again.
Step 4: Inspect Pulleys, Bearings, And Tensioners
Check every pulley before installing the new belt. This part of the job matters just as much as the belt itself. A complete belt drive system inspection covers pulleys, bearings, tensioners, and alignment—not just the belt.
Inspect the system for:
- Idler pulleys that feel rough when spun by hand
- Side-to-side play in pulley bearings
- Damaged or debris-packed pulley grooves
- Bent brackets
- A tensioner that sticks, jumps, or does not return smoothly
- Nearby leaks from seals or coolant hoses
- Accessory shafts that wobble during rotation
A new belt may run for a short time on worn parts, but it usually will not last. If a pulley bearing feels rough or loose, or if the tensioner does not move smoothly, those parts should be corrected before the belt goes back on.
This is also a good time to inspect nearby engine accessory parts. A leaking water pump or a failing alternator bearing can shorten belt life very quickly.
Step 5: Match The New Belt
Check the new belt against the old one before installation, but use the correct part number and service information as the main reference.
Compare:
- Overall length
- Width
- Rib count
- Belt profile
- Part number from the manual or machine parts catalog
The old belt may have stretched with age, so a visual comparison by itself is not enough. If the replacement does not match the required specification, do not install it.
Step 6: Install The New Belt
Fit the new belt carefully into every pulley groove. Route it around the lower and fixed pulleys first, then leave the easiest accessible pulley for last if needed.
As the belt goes on, make sure each rib sits fully in place and that the belt is not twisted. On serpentine belts, rib alignment is critical. On V-belt systems, correct seating in the groove matters just as much.
Before restoring tension, look across the full belt path again. If the belt sits crooked, rides too high, or misses a groove, correct it before moving on. This kind of attention to detail is what separates a quick fix from a proper understanding of how to replace a drive belt.
Step 7: Set The Correct Tension
Correct tension is one of the most important parts of drive belt replacement. A belt that is too loose can slip and overheat. A belt that is too tight can overload bearings and shorten the life of nearby components.
On automatic systems, the tensioner should return smoothly and hold the belt steady. On manual systems, adjust tension to the manufacturer’s specification. If the system calls for a belt tension gauge, use one. Setting tension by feel rather than using a gauge often leads to noise or early wear.
| Tension Problem | What Usually Happens |
|---|---|
| Too Loose | Squeal, slip, heat, weak accessory performance |
| Too Tight | Bearing wear, pulley stress, short belt life |
| Correct Tension | Stable tracking and quiet operation |
Step 8: Start The Engine And Recheck
Start the engine and watch the belt at idle before putting the machine back into normal use.
Check for smooth tracking, stable tensioner movement, and unusual noise. Listen for squeal, chirp, or slap. Watch how the belt runs across the drive pulleys. If it walks sideways, throws dust, or makes repeated noise, shut the engine down and inspect the system again.
On manual-tension systems, it is also worth rechecking tension after a short run period. A new belt can settle slightly after installation.
When DIY Makes Sense
Some belt jobs are simple enough for a careful owner. Others are better left to a technician.
DIY replacement usually makes sense when:
- The belt is easy to access
- The route is clear
- No pulley noise is present
- No major disassembly is required
- The correct replacement spec is easy to confirm
Professional service is usually the better choice when:
- The belt path is hidden
- A pulley has side play
- The tensioner is weak
- The machine has a history of repeated belt failures
- The system is model-specific and difficult to adjust
- Several nearby heavy equipment parts need inspection at the same time
Common Drive Belt Replacement Mistakes
Most repeat belt failures come from a small number of avoidable mistakes.
Skipping The Routing Check
Without a photo, diagram, or routing sticker, the belt can easily go back on the wrong path. That can cause poor tracking, wrong tension, or incorrect accessory operation.
Replacing The Belt Only
A worn belt is often only part of the problem. Bad idler pulleys, weak tensioner assemblies, or bent brackets can damage the replacement belt quickly. Installing a new idler pulley along with the belt prevents repeat failures and keeps the system running smoothly.
Using The Wrong Belt Size
A belt that looks close is not always correct. Wrong length, width, or rib count can create noise, slip, or alignment problems from the start.
Ignoring Fluid Contamination
Oil and coolant reduce belt grip and can damage the belt material. If there is an active leak nearby, deal with it before fitting the new belt.
Setting The Wrong Tension
Incorrect tension is a common cause of early belt failure. Loose belts slip and overheat. Overtight belts can overload bearings and shorten the life of related charging system components and other rotating parts.
Forcing The Belt Into Place
If the belt seems too difficult to install, the route may be wrong, or the tension may not be fully released. Forcing it into place can damage the belt before the machine even runs.
Skipping The Final Inspection
Some belt problems only show up after startup. A final check often catches poor seating, misalignment, or unstable tension before the machine returns to work.
Ignoring Clear Warning Signs
Don’t ignore burning rubber, ongoing squeal, belt debris, or climbing temperature. These often mean trouble in the belt drive or surrounding cooling parts.
Conclusion
The secret to a belt replacement that lasts is not the belt itself. Learning how to replace a drive belt properly means knowing that the tensioner and pulleys matter just as much as the new belt. Worn supporting parts will destroy a new belt quickly. Inspect them carefully before installation. Check the belt tracking after startup. Get these steps right and the job stays done. For owners of heavy equipment, a supplier that provides accurate fitment information and carries the full range of related parts is a useful resource. FridayParts is one option worth considering.
